Okay, so what can you do during a pandemic to keep sane and mentally sharp? Answer: work on some technology projects. Even though that’s not your business and you’re not a technologist, working on some technology projects can keep you sane and positive during the shutdown when you are at home all the time. After all, you can’t go out, you can’t do much. You can’t travel. You can’t really walk around very much. What’s going on right now is that if you have a computer and it is connected to the Internet, this is your lifeline. But it is not enough to just consume. You can’t just watch Netflix all the time. You can’t just play video games all the time. You can’t just read news all the time. You have to do something to work your brain. You have to do something to grow. And one of the things that you can do without leaving your house, your place of shelter, is work on various technology projects. You can take on projects that will be helpful to you. And if the project isn’t helpful at the very least you learn a lot of about technology.
And it’s important to learn about technology because technology is everywhere. It has seeped everywhere in our lives. And one thing for sure, in this pandemic, technology is something we can rely on. Technology ultimately is going to be the thing that saves us. It will be some scientist or company using the latest technology in biology or chemistry or both who will make a breakthrough and create a vaccine that protects us.
In terms of what we’re relying on. Just look at companies like Amazon, Apple, Google, and Microsoft. They’re the backbone of our survival right now, because they’re not going down. We are relying on them more and more. And because of that, it is helping us survive. We can communicate better with each other. We can do our job using technology. Look how Zoom has taken off for everyone, not just for businesses, schools are using Zoom. People are having private Zoom parties.
So over the last few weeks, I went on an epic adventure where I learned tech about the Internet and created projects.
So what kind of projects can you work on? Well, one thing to do is work on creating your own website. And I don’t mean do it the easy way where you go to a site like Squarespace or WordPress where they will host your website, and they will just make it easy to create a website through a few clicks. Don’t do the easy way like that. There are a number of reasons why not to do it the easy way. First it’s more expensive to create a website like that. Squarespace costs at least $12 per month. WordPress starts at $4 per month but quickly goes up if you want to add stuff to help your website.
I found a way to host multiple sites for a total of $5 per month. More on that later. But the main reason not to use turnkey services like Squarespace or WordPress hosting is that you can learn to do it yourself with any server on the Internet. That way you understand what is underneath your website, the server itself.
What do I mean by that? Well, everything on the Internet runs on something you’ve maybe heard about called a “server.” A server, just like a butler server at a party, “serves” you something. But a server on the Internet serves you digital data when you go to that server. So when you go to an Internet website, a server somewhere is sending you digital data to your browser.
A server is nothing more than a computer somewhere connected to the Internet that is hosting the data that comes to your browser. Some servers actually are sending not digital data to your browser, but sending digital data to your app on your iPhone or iPad or Android device. Also, when you talk to Amazon’s Alexa device, the information that Alexa is giving comes from a server that Amazon has hooked up to the Internet. When you make a Zoom call, a server somewhere is making the connection for you with the people that you are calling on Zoom.
Now you could have a server at home. After all, your Windows computer or Mac is a computer. So your home computer can be a server. But if you want your server at home to serve digital data outside your home, you are in trouble. Trouble because the companies hooking up your home to the Internet, like Comcast and FIOS, they are making your address at home unstable for guests in the outside world to find it. That is because you have a dynamic IP address. You see all devices hooked up to the Internet have a unique IP address. The problem with trying to run a server from your home computer is that your Internet provider, i.e. Comcast, FIOS, etc, gives you a dynamic address. Your unique number changes. You need a “static” address for your server.
So if you really want to serve digital data to the outside world, it is best to get space on a server outside your home that is specifically set up to give you a static address so people can find you on the Internet. Now when you go to a company like Squarespace and open an account, that is what Squarespace is doing. It is giving you space on a server. But is also giving you other things, like services to make it easy to design and have your own website.
Once you have a server and a static server address, you also want to have a domain name. Now this you probably know. Right? Facebook.com is a domain name. Cnn.com is a domain name. Every website name you know on the Internet is a domain name. Now a domain name is not a server and a server is not a domain name. You have to pay an annual fee, usually around $10 to $15 per year, for a domain name that isn’t already used by someone or some company. There are various companies that can help you register and get a domain name. Squarespace does it as part of its service for hosting your website. But there are companies that do nothing but register and sell you the domain names. The company I use because it has a decent reputation (i.e. not trying to up-sell you all the time or making it hard to transfer your domain to another site) is Hover. You go to a service like Hover, and you try out different domain names to see if they are available. And you can also get domain name suffixes other than the traditional .com. They have .tv, .blog., even .poker and .bet. Be careful though. Some of those suffixes are very expensive annually. Go for the traditional suffix: .com. That is a classic.
Multiple sites for $5 per month on Linode
So how did I do it so cheaply? Well what I found out is that there are various companies which give you a good server that is cheap, but you don’t get the service that holds your hands to create a website. Think of it like this. When you buy food, if you go to a store that does wholesale rather than retail, you get a better deal. That is why Costco, e.g., has such good prices. Well regarding selling servers on the Internet, there are companies selling server services wholesale. Their market is not selling retail to you and me. Their market is really selling to developers and companies that need a lot of Internet servers. The biggest company doing this is of course Amazon.
Many years ago, Amazon realized it was really good with having servers on the Internet and having services on the Internet for its own Amazon website. After all, Amazon was selling zillions of books and then selling zillions of other things on its website. Amazon realized it was so good with servers for its own business that it realized that it could sell services to third-parties. Amazon created low-priced servers on the Internet for developers. That business is called AWS: Amazon Web Services.. AWS took off; particularly with developers making apps for the iPhone. They needed services on the Internet to send digital data to the their apps on the iPhone. AWS was a very good and cheap service to do so. You probably don’t know this, but many of the web services and apps are hosted on AWS. It is a huge business for Amazon.
Well others are competing with Amazon on that wholesale business. Microsoft pivoted from just focusing on Office and Windows to now providing Internet services for developers through its Azure service. Google has its Cloud service..
Now there are Internet hosting companies that are much smaller than these big three. Several years ago, I found a good deal at one called A Small Orange (ASO).. I got 5gb of server space for $5 per month. I purchased this originally to host a website for a relative who was a doctor because my relative didn’t have website. The website was just to have straight forward information about my relative’s office.
I created the website with what some would consider a non-traditional app to create websites: Hype by Tumult.. Tumult was created by some guys who had worked at Apple. Hype was created to create animations using HTML5 technology. Do you remember Steve Job’s April 2010 “Thoughts on Flash” announcement?. It is still on Apple’s website. Flash was that technology that created all those animations on the web starting back in the 1990s and continuing to a couple of years ago. Adobe owned that technology. Apple refused to allow the iPhone and iPad to run Flash on those devices browsers. This was a big deal back in the early days of the iPhone and iPad because some sites and content on the Internet could not be accessed because of the lack of Flash support. But Steve Jobs was adamant that Flash sucked. In his lengthy polemic against Flash in April 2010, he listed many reasons Flash was not good, including that is was proprietary and chewed up battery life. Jobs and Apple pointed out that HTML5 technology, which was open source and part of the backbone of the web, could work better and replace Flash.
Tumult was created to create an app on the Mac which could create HTML5 animations that could replace Flash animations. So I dabbled in this great app when it first came out. Using this app, I created a website with buttons and menus for different pages which I uploaded to ASO and linked up to a domain name I purchased at Hover.
After I created the relative’s website, I realized that in my ASO account I could create additional sites on the same 5 gb space. I also discovered I could do this through an interface app that ASO had for my server space called cPanel. cPanel is a graphical user interface app for your the server space so you can navigate easily your server and install apps. It is not free, but it came part of my ASO account. ASO must have paid the cPanel company that leases or sells that app. So why is there this cPanel interface?
It is there because pretty much all these servers run on an operating system called Linux. It was created by this guy back in 1991 named Linus Torvold. Practically every server on the Internet runs on a version of Linux. Since it is open sourced, developers and business have created “forks” of Linux over the years. On most servers on the Internet Debian or Ubuntu is used. The most famous fork of Linux is Android, which run the smartphones and tables competing with Apple’s iPhones and iPads.
So through this cPanel interface on ASO, I created two more websites using WordPress. One for my website MacsFuture.com and the other one for my kids’ sports. I wanted to created WordPress sites because for many years I read and heard how a big chunk of the web was WordPress sites. WordPress is so successful because it’s an open program. This is what Wikipedia says:
WordPress (WordPress.org) is a free and open-source content management system (CMS) written in PHP[4] and paired with a MySQL or MariaDB database. Features include a plugin architecture and a template system, referred to within WordPress as Themes. WordPress was originally created as a blog-publishing system but has evolved to support other types of web content including more traditional mailing lists and forums, media galleries, membership sites, learning management systems (LMS) and online stores. WordPress is used by more than 60 million websites, including 33.6% of the top 10 million websites as of April 2019, WordPress is one of the most popular content management system solutions in use. WordPress has also been used for other application domains such as pervasive display systems (PDS).
Wikipedia on WordPress(footnotes omittied).
So I had never tried a self-hosted WordPress before so I went for it. Because ASO had a cPane, in cPane there are different server apps that you can put into your server. It was pretty easy. And then, I hooked it up those two sites with domain names from Hover.com. So great, I then had two websites and my relative had one website on a $5 per month server from ASO. Everything was going well. Until …..
Last year, I realized that ASO was charging me more than $5 per month. Here is how much they were charging and the increases over the years.

So you see it went from $40 to over $90 in a few years. But that isn’t what got me to finally switch my sites to another company that leases servers. It was SSL.
What is SSL? SSL is that lock you see on the domain address when you go to various websites.

That lock tells people going to your website that there is security on your site; particularly that you are who you claim you are. This is important if the people going to your site are putting private information on your site. For example, a bank which has customers logging in would want such security. Or if your site was collecting email address from people signing up for your site. You may have seen these locks on website address popping up a number of years ago. But the practice of having ssl certificates on sites took off and practically every site has that lock because Google says if you don’t have that lock then it would lower the score for your site:
Thursday, February 8, 2018
For the past several years, we’ve moved toward a more secure web by strongly advocating that sites adopt HTTPS encryption. And within the last year, we’ve also helped users understand that HTTP sites are not secure by gradually marking a larger subset of HTTP pages as “not secure”. Beginning in July 2018 with the release of Chrome 68, Chrome will mark all HTTP sites as “not secure”.
Google February 8, 2018 Announcement
The “s” after http is what makes the lock. What is going on is that the connection to your site is being encrypted and a third-party service is giving you a certificate certifying that your site is encrypted. Over time, particularly since the summer of 2018, I realized my sites looked poor without being “https:” and having the corresponding lock. I Googled around and found that some hosting sites for servers, particularly ones that helped host self-serving WordPress sites, provided free SSL certificates. I checked with ASO, and they didn’t provide any free SSL service. In fact, they charged a substantial amount.
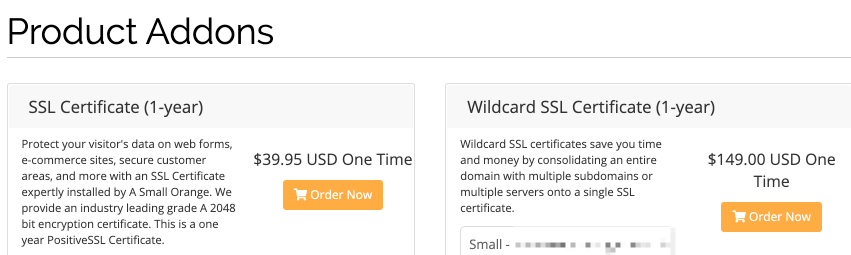
As you can see, an add on service for an SSL would cost me $40 annually at the very least and a wildcard SSL even much more. The thing is I looked around and there is a free SSL certificate service called Certbot that is provided by the Electronic Frontier Foundation. The EFF is a highly legitimate nonprofit organization which among other things, protects the free use and free speech on the Internet. I looked around the web and found out that some server providers which had cPane installed provided an app on cPane to allow users to easily install a free Certbot SSL certificate for the self-hosted WordPress site. I checked ASO’s cPane and none existed there. I emailed ASO support and they confirmed they didn’t provide such a plug in for the free service.
The fact that ASO was charging me more than $90 per year and not even providing me with an easy way to install a free SSL certificate really bothered me. Then I took a look at Linode. For years I heard about Linode on podcasts as Linode sponsored a lot of tech podcasts. Linode I realized was for customers who are developers. Linode was really competing with Amazon’s AWS, Google Cloud and Microsofts Azure. The thing about Linode that caught my eye was it was cheap. Linode’s cheapest plan gave me 25 gb of storage on a server and 1000 Mbps out in speed all for $5 per month. By comparison, ASO only gives 500mb of space for $6.51 per month. $8.80 per month would get you just 5 gb of space. That was the plan I was on at ASO that was originally $5 per month when I signed up. Linode wasn’t offering me a cPane app for free with the server space I would lease. It turns out if I wanted a cPane I would have to pay extra. And that is part of the reason that ASO was charging more than Linode. Nor did Linode offer a free SSL certificate.
I decided to try Linode because. It had a community and answers on its website where you can find out information on how to set up a Linux server without using a cPane program. I had to figure out Linux commands to set up the Linode server. Then I had to figure out how to put SSL certificates on those severs.
I did it. I was able to transfer my sites from ASO to Linode. It wasn’t easy. It took time. But here is the important thing: It was really satisfying as I learned how to:
- SSH communicate from my Mac to the Linode server.
- Use the Terminal App on the Mac after SSHing to the Linode server to download and set up apps on the server using Linux commands.
- Set up Apache on the Linux server to create virtual servers given I had only one LInode server and wanted to have more than one website on that server.
- Download and install three WordPress sites from scratch.
- Navigate in the server files and folder structure for WordPress.
- Use Nano on Linux to edit and change the config documents for WordPress and Apache.
- Configure MySql on the server as the databases for the WordPress sites.
- Configure the DNS on Hover and Linode to set up the various domains I created on one Linode server.
After completing the set up of the various sites and setting up the domain connections, I still had to solve another problem: getting SSL certificates so I would have that lock symbol and the https addres for my sites. The great and free solution I eventually came across was to install the Certbot certificates using command line instructions on the Linode server through ssh connection through the Terminal app on my Mac. These free certificates only last three months but Certbot comes with commands where you can set up a “cron.”. Cron is a service on Linux where you can automatically run commands. So I set up a cron using Certbot so that Certbot will renew the certificates a week or two before the certificates would run out. Pretty cool.
So here you can see my https://macsfutures.com site all set up on Linode. But the fun and my learning did not stop there. I continued to explore.
Static Web Sites
While researching installing WordPress on Linode, I came across a trend that has been going on over the last five years or more: static sites. A number of bloggers and developers are arguing that static sites are faster and better on the web than dynamic sites. A dynamic site in contrast to a static site changes based on who goes to the site. So Facebook is a dynamic site because based on who goes to that site, the site changes. WordPress is a dynamic site because it uses a database, MySql, behind the website. It turns out, a number of geeks and others on the web figured out the websites that are static run faster on the Internet.
I learned that one static site publishing platform is called Hugo.. There is a website at https://gohugo.io where it says that Hugo is “The Word’s Fastest Framework for Building Websites.” It is written in Google’s developer’s language called Go. I was curious to try it because 1) it claims to be much faster, 2) you can write your posts as simple “Markdown” text files,” and 3) Linode’s new “Object Storage Plans,” can host static websites.
So let’s go through each of these. First, faster website. This one is easy. Why wouldn’t I want a faster website? If it’s quicker to load for users, users will like my website better. I hate going to websites that are slow. I hate websites that load all sorts of videos and crazy stuff and adds. Nice simple websites are the best.
Second. Hugo works with Markdown files. What is Markdown?
Markdown is a lightweight markup language, originally created by John Gruber and Aaron Swartz allowing people “to write using an easy-to-read, easy-to-write plain text format, then convert it to structurally valid XHTML (or HTML).
markdown-guide.readthedocs.io citing wikipedia [1] [2]
The fact that Hugo worked with Markdown files appealed to me. I had played around with word processors that use Markdown for many years. On my Mac and my iOS devices I have long used Byword.. There are many apps on iOS and on the Mac that use Markdown. The beauty of Byword is that there isn’t hidden code and formatting such as in Microsoft Word or even Apple’s Pages program. You write in simple text. And if you are going to format it the code is simple and easy to read so it isn’t confusing. Hugo treats each Markdown text file you create as a blog post or a page on the Internet depending on what folder you put it in. It is a really simple concept. So writing in Markdown really appealed to me and is a plus for using Hugo.
Finally, if I can host a site on Linode’s Object storage, that is a great deal for website hosting. Linode gives you 250 GB of storage for just $5 per month. That is 10 times as much storage for the same price as its regular storage that can host dynamic sites like WordPress. Hosting sites cheaply on the Internet is pretty amazing after all. And the cheaper you can do it the more amazing it is. Technology is all about bringing efficiency and reducing the cost.
Think about how hard it was to publish anything so other people could see it. In the early 1700s, a young Benjamin Franklin wanted to run his own printing press and newspaper. He had worked for a press in Boston when he was a teenager. After he fled from Boston to Philadelphia, to get away from his domineering older brother, he wanted to use his experience in running press to create his own press. Franklin obtained significant funds, a fortune in todays funds, and travelled by boat all the way to London to purchase an old press and then transport it by boat to Philadelphia. The rest is history. He became a prominent publisher, inventor, legislator and founder of the United States. Read more on Franklin here
Today, you can run hundreds of sites each for under $20 day using Linode’s 250 gb Object Storage program for $5 per day. You could have all the static websites you create share the $5 per month storage on Linode. $60 per year divided by 100 sites is 60 cents per year. A domain for each site would be $15 per domain. This brings the cost to $15.60 per year for each domain. In terms of a device to set up the sites, you can get a cheap computer (like a chrome book) and use your phone’s hotspot or free Internet connection in a library or park. The friction to publish now is 1/millionth the friction that young Benjamin Franklin faced.
Hugo
Getting back to Hugo. You can install the Hugo publishing platform on your server or you can publish on your Mac and then have the static website it creates sync with your website. I decided to run it on my Mac. Here is how I did it.[3]
First, it involves using your Terminal App on your Mac. Remember what computer screens looked like before the Mac was created and Microsoft copied the Mac and created Windows? It looked like MS-Dos.
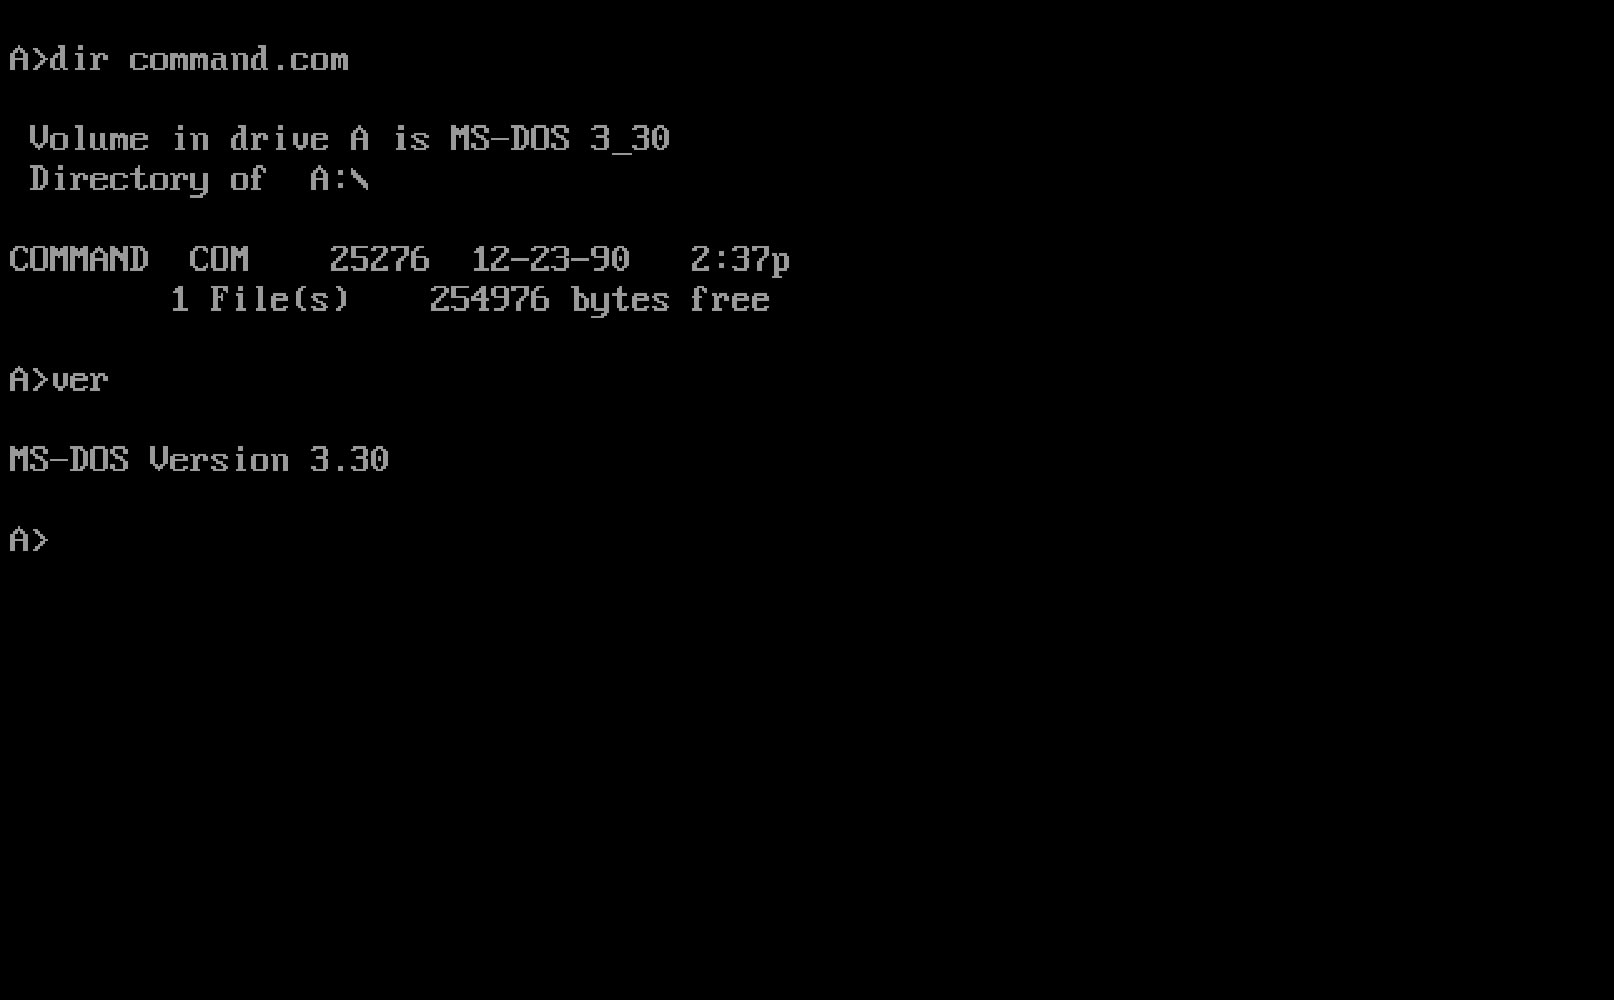
(Credit to the Interface Experience for the MS-Dos Photo.) Giving instructions by text is called using the “command line.” All of you using iOS devices, and Macs, Windows and Chrome computers may be oblivious to the subterranean world underneath the user interface. On Macs, the user interface is built on an older technology called UNIX. The operating system for the Mac is running on a relative of UNIX. UNIX was created by the telephone company’s computer lab back when there was one telephone company for the entire United States. The Terminal App is using UNIX like commands. Those commands are very similar to the Linux commands on a Linux server as they are both related to UNIX. Read more on Unix here.
For installing it on a Mac, the people behind Hugo suggested to first install Homebrew.. Homebrew is a package manager that allows you down load development software on your Mac or even Linux. The idea is once you install Homebrew you can then more easier install other things on your Mac. Here is the command on the Terminal App to do so. It is not for the faint of heart if you have never used the Terminal App before.
/bin/bash -c "$(curl -fsSL https://raw.githubusercontent.com/Homebrew/install/master/install.sh)"
Then after you install Homebrew, you use that to install the Hugo package on your Mac.
brew install hugo
Once it the Hugo publication system is on your Mac, you create a Hugo command in the terminal to create a new site, and it creates a folder on your Mac for the site with various folders. (Look here for various Hugo commands.)
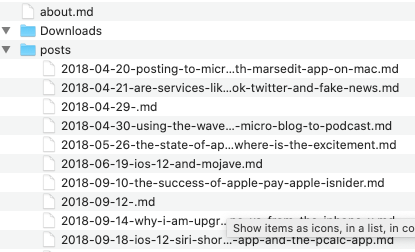
This is what the folder looks like after you generate a site on Hugo.

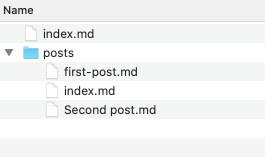
The folder that is labeled “Public” is the web documents you put on your server. The rest of the folders are what Hugo uses to make the website. The folder Content is where the content you create, i.e. writing, photos, and videos, go into. And the Folder called Themes is where the different themes you can use to make your website are put. In Content folder there is a folder called Posts. This is where your blog posts go. Take a look at mine. What you see below are separate Markdown files. Each one is a separate post.
These Markdown files for each post take up hardly any storage space as they are pure text files. They are easy to back up and use if you change where your website will be.
As for themes, you download different Hugo themes people created and put them into the Themes folder. Then you open the config file and reference the theme you want in your Theme folder for that site. It’s a simple word reference. See:

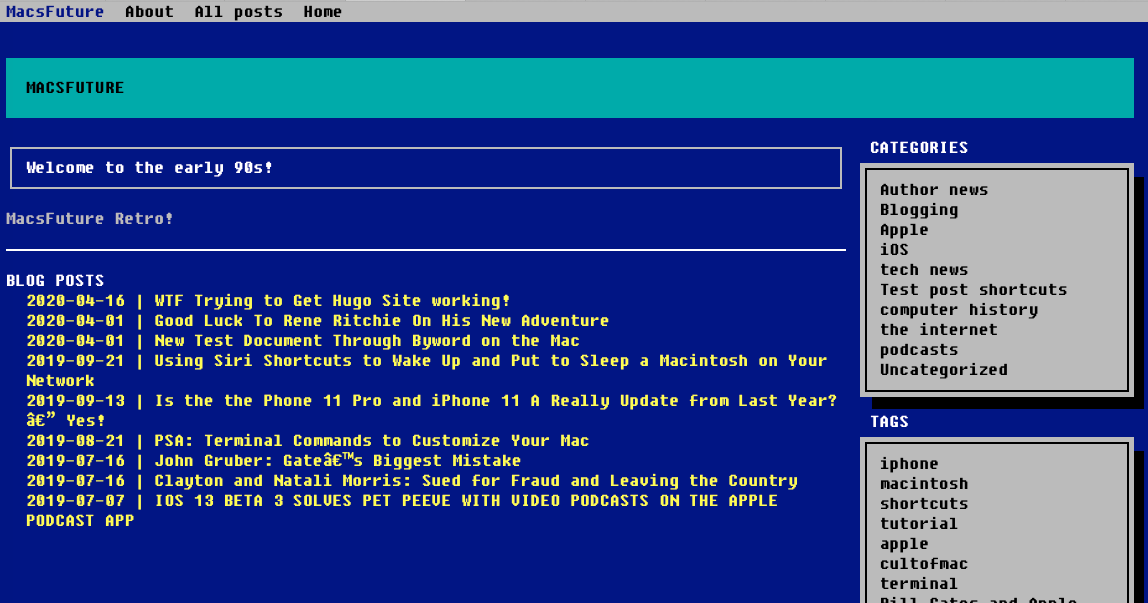
I found this crazy Hugo.386 theme that makes your site look like the old 386 PCs, i.e. the ones with MS-DOS commands. I created a subdomain that shows off this Hugo theme here.. Here is a screenshot of this Hugo site.
To add posts to this site, I add a new Markdown post file in the post folder. Then I run a command in the Terminal App to remake the site in the public folder, and then sync that folder to the server. If you run Hugo on the server, you can just add the Markdown file on the server’s Hugo content post folder and it will rebuild the site on the server.
Swift Static Site Publisher
After I successfully created a Hugo site, I then got interested in another program to create static websites. What caught my eye about it is that it used Apple’s Swift language to create a static site. It is called Publish by John Sundell and you get it on something called Github.com.
First thing first. What is Swift? Swift is Apple’s code language that Apple developed for developers creating apps and programs for IOS devices and Macs. Back on June 2, 2014, Apple announced Swift at the WWDC conference it holds every summer.. No one saw it coming. For years Apple and developers for the iOS devices and Macs used a language called Objective-C. Swift was supposedly to be simpler to use and be more powerful. Apple has been pushing everyone to use Swift and created an App on the iPad many years ago for kids and everyday people to use Swift, called Swift Playgrounds. Over the years, I have dabbled in learning Swift through that Playgrounds app.
During the last year, one of the podcasts I have been listening to is called Stacktrace, which is hosted by two developers, John Sundell and Gui Rambo. These two young developers are very entertaining. Rambo is from Brazil and he helps out the website 9to5mac.com by looking deep into beta IOS systems for clues for what Apple is working on in the future. Sundell is a Polish developer who also runs the great Swift website Swift by Sundell. He gives tips on the Swift language and it is a great resource. It is John Sundell who during the last year created an application called Publish which uses the Swift Language to create a static website. His own website, Swift by Sundell is built with that Swift language tool. Having had success building a Hugo website, I thought what the heck, let’s try building one with Swift.
Publish by John Sundell
So John Sundell created this Swift language Publish program. You have to download it from Github. [4]. Similar to Hugo, you can download using commands on the Terminal Program on the Mac. There is one difference though. Because this Publish program uses Swift, you need to make sure you have Xcode on your Mac. Xcode is Apple’s program for developers to create apps on the IOS devices and also programs on the Mac. So similar to Hugo, after you use Publish together with Xcode it creates folders on your Mac. It looks like this.
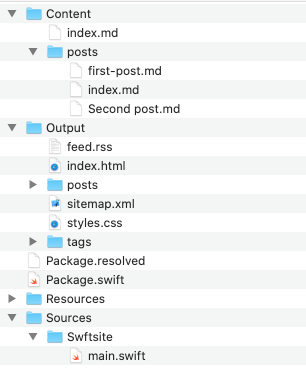
Like with Hugo, the Content folder is where you put the content for your website. And again like in Hugo you put Markdown files to create your posts.
This is what the content folder looks like.
What goes onto your website is in the “Output” folder. This is where it differs from Hugo which calls it its “Public” folder. Now I don’t think you can run this on a server unless the server has Xcode or something that executes the Swift language. Most servers run on Linux. There are places you can rent Macs as servers. For example there is Macstadium where you can rent a Mac as a server. But that is much more expensive for a minimum plan compared to Linux as MacStadiums cheapest plan is around $80 per month for a Mac Mini. So publishing a Swift static website would require you to sync the Output folder on your Mac with your server. [5]
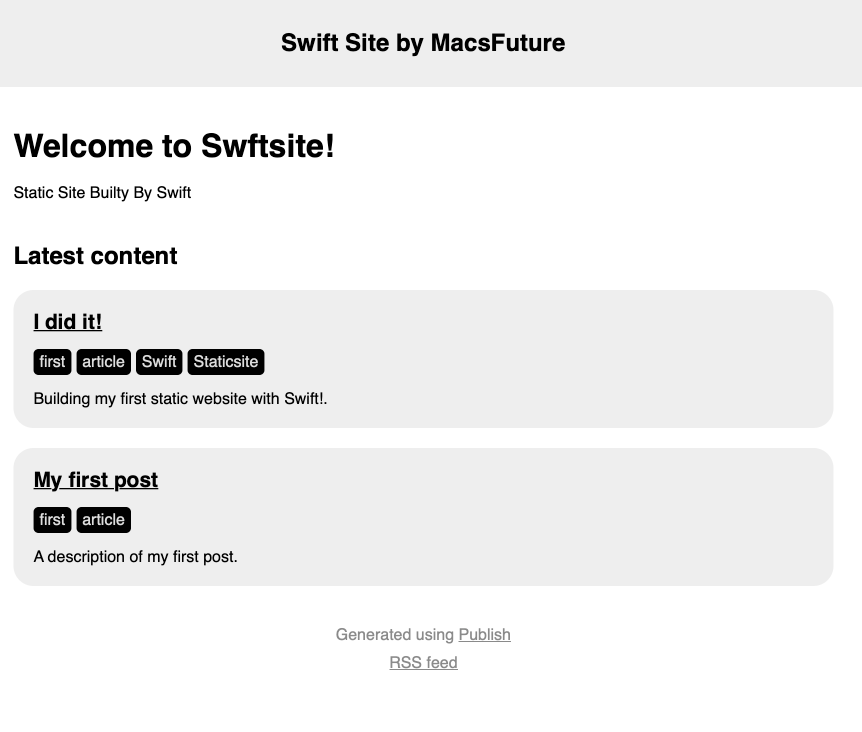
So I created a Swift static website successfully and I am hosting it as a subdomain. You can see it here.. It has a rather simple looking design , which you can see here.
Jitsi
The adventure didn’t stop there. I kept stumbling upon things to try out on the $5 Linode server I rented. Now during this pandemic everyone is using live video programs to connect with each other. People are using FaceTime and Skype. But Zoom became very popular because it is easy to use. Then I heard about this service, Jitsi, which is open source and is supposed to be very secure. So what is Jitsi? In the open source entity’s own words:
Jitsi is a set of open-source projects that allows you to easily build and deploy secure video conferencing solutions. At the heart of Jitsi are Jitsi Videobridge and Jitsi Meet, which let you have conferences on the Internet, while other projects in the community enable other features such as audio, dial-in, recording, and simulcasting.
So why should you install Jitsi on your own server? You can make calls for free using Jitsi’s own website. It works with the Jitsi app on the iPhone which you can get here. They also have an Android App.. The reason to get Jitsi installed on your own server is 1) it is more secure, and 2) how cool would that be? It is more secure on your own server because you control your server. You don’t have to worry that someone at Jitsi is eavesdropping on you. With Zoom or other services you don’t control the server that your calls are going through. Same with FaceTime or Google Meet. They are all going through a third company’s server. Here you can install Jitsi even on a server in your home. The Second reason to install it on your own server is it is cool to do so. You can tell people you have your own video calling service. So I decided to go forth and install Jitsi.
It wasn’t that hard to install Jitsi. The Jitsi website gives you the instruction to install it on a Debian or Ubuntu server here. I installed it as a subdomain on one of the sites I had on Linode.
One of the problems I had after I installed it is that the initial set up allows anyone to make a video call. I didn’t want that as I have a small server and if people I didn’t know were using it it could rack up my server bill. I found this video from early April 2020 from Nerd on the Street on Youtube very helpful for configuring Jitsi after I had it up and running.

His video showed me how to configure Jitsi so that a call could only be initiated with my password. So Jitsi works on the server I am leasing. But because it is the cheapest server and is small, I don’t think it can take a lot of calls at the same time. I would have to upgrade the power of my server if I want to make many calls.
Nextcloud
The adventure didn’t stop at Jitsi. I was recently listening to this podcast. Release Notes. One of the hosts runs a business on the Internet where he makes websites for professionals, tax accountants. I realized listening to him that his business involves creating WordPress sites on a Linode server. I heard this after first transferring my sites to LInode. On this podcast, I heard he created for his customer a service on their website where their customers could upload documents to them. In other words, his tax accountant customers could have their own Dropbox or iCloud built into their site. The way he did this was using an open system called Nextcloud.. As stated on its website:
Share and collaborate on documents, send and receive email, manage your calendar and have video chats without data leaks. As fully on-premises solution, Nextcloud Hub provides the benefits of online collaboration without the compliance and security risks.
Basically, Nextcloud is an open source system taking on big players like Microsoft, Google and Apple and allowing anyone to host cloud services on their own servers. You can use what ever you want.[6]
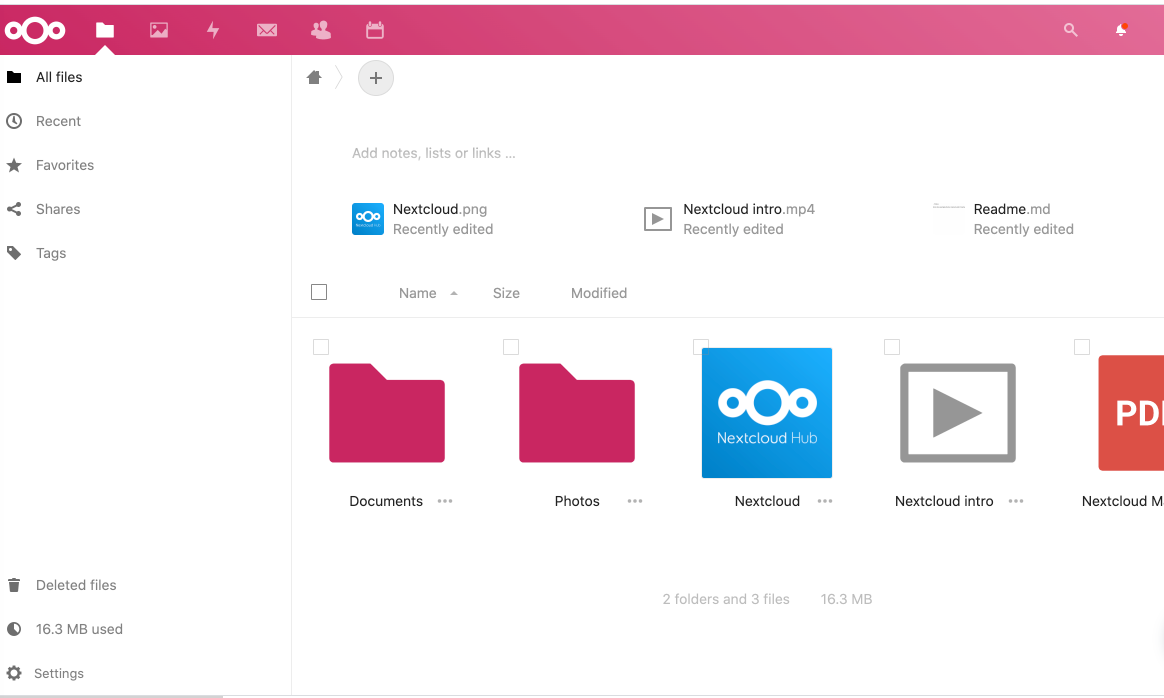
So I installed Nextcloud on my own site as a subdomain. It is really cool. When you open it, feels like you have your own Microsoft company on your website. Here is a screenshot.
Next Cloud has apps for the Mac and iOS and other devices. After I downloaded the Nextcloud app on my Mac it created a folder named Nextcloud. That folder on my Mac automatically syncs with my Next Cloud app on the server. So I have my own iCloud or Dropbox. This is really cool. You can invite users. According to Nextcloud, it is really popular in Europe particularly Germany and a lot of universities and companies use it. I don’t know why schools and companies don’t use it here. They could save so much money that they are paying to Microsoft and Google.
Transmit App for the Mac.
Finally, I should mention the one purchase I made during this crazy adventure: Panic’s Transmit 5 program for the Mac. For most of this technology adventure, I was mainly using the Terminal App on my Mac to navigate the folders and files on my Linode server. It was a real pain as you have to type out commands to get to the right folder. Then I remembered that for many many years, the bloggers and podcasters who love Apple and Mac always praised the Transmit program. I checked it out and purchased it. It was a godsend. It is basically a powerful Graphical User Interface for connecting to servers with SSH connections and navigating and editing files on servers. On its fifth generation, It is a well polished and beautiful app.
Once I started using Transmit to connect to my LInode server, it made life much easier. Transit has a feature where if you have to use the Terimal to make commands on the server, you can go straight from a folder on Transit app to the Termina and put the path from from the server on Terminal. This makes navigating the server much much quicker than doing it with command line instructions on Terminal.
Conclusion
There are many adventures in technology. Our ancestors like Ben Franklin went on their own adventures with tech. It is unfortunate that we are living through this virus pandemic that is destroying lives and taking away our normal life in the outside world. But many of us, with decent computers and Internet connections, are lucky. There are adventures and learning available on our finger tips. Use this time to explore what you don’t know. Take on a project. Take it on just to learn something and see if you can build it. Having set up various WordPress sites, created a Hugo static site, created a Swift static site, created a Jitsi server, and created a Nextcloud server, and all the while reduced my server cost by going to Linode and most importantly, got those SSL locks on my domain addresses, I am now at the end of this adventure.
What adventure comes next? Stay tuned.
Lex.
- John Gruber is the famous Apple-related blogger who runs DaringFireball.net ↩
- Aaron Swartz is the genius on the Internet who was prosecuted for trying to make public research university publications that are subsidized by the Federal Government. He committed suicide when the prosecutors insisted he go to jail. Read more on Swartz here. ↩
- Here are instructions on installing it on your Mac from Hugo’s site. ↩
- Github is a famous website for developers. There you can work on codes for programs and apps or web development and work with other developers. It has been around for a long time. Microsoft purchased Github in 2018 for $7.5 billion. That is how popular it was. ↩
- You probably can’t run this Publish Swift program on a non-Mac like Windows as you need something to compile the Swift language which requires Xcode from Apple. ↩
- I found out that Nextcloud is an off shoot of OpenCloud, and that both were created by this man, Frank Karlitschek, a highly talented German developer. He is a big believer in open systems and individuals taking back control of their data. ↩


